Friday, May 25, 2012

Paint Chalk

This was super easy to make and the kids loved it! It's a liquid and resembles paint but after it dries on the sidewalk/blacktop it turns into chalk! 


WHAT YOU DO: Mix 1 cup of cornstarch with 1 cup of water and then add a few drops of food coloring =) 

Sunday, May 20, 2012

Reese's Popcorn

Today has been one of those lazy movie days and what's a movie day without popcorn? Problem though, regular popcorn was really doing the trick for me. And that's when I realized I had a stash of Reese's peanut butter cups in my pantry. Ohhh these ideas I get!

recipe adapted from Two Peas and Their Pod
REESE'S POPCORN
ingredients
  • 8 cups of plain air popped popcorn
  • 1/2 c honey
  • 1/3 c sugar
  • 1/2 c peanut butter
  • 1/2 tsp vanilla
  • 1/2 c of chocolate chips, melted
  • 1 1/2 c chopped Reese's 
instructions 
  1. Microwave popcorn according to box directions; place in large bowl and set aside
  2. Mix the honey and sugar in a small saucepan, bring to a boil. Let it simmer for about 2 minutes, then remove from the heat and add the peanut butter. Stir until all the peanut butter is melted, add in the vanilla. 
  3. Pour peanut butter mixture over popcorn, gently stir until well coated. Add in the chopped Reese's.  Drizzle popcorn with melted chocolate and let sit until chocolate hardens. 

Now make sure you share, but I'll admit it's not that easy  =)
Enjoy! 

Friday, May 18, 2012

Crock Pot Hawaiian Meatballs

Confession-- I'm a huge crock pot fan, come on now who isn't? I just love throwing the ingredients in there, letting it do its thing, and bam when I get home from work it's ready for me. I came across a Hawaiian Chicken recipe over at Chef in Training but I decided to switch it up and use meatballs instead. Mmmm deliciousness and its super easy!

CROCK POT HAWAIIAN MEATBALLS

ingredients
  • 12-15 frozen meatballs 
  • 1/2 c ketchup
  • 1/2 tsp Worcestershire sauce 
  • 1 tsp mustard
  • 1-2 cans crushed pineapple (with the juice)
  • 1/2 c brown sugar
instructions
  1. mix ingredients all together
  2. cook in slow cooker 4-6 hours on low
  3. serve over brown rice
Make this into a freezer meal-- combine all ingredients and store in freezer bag! 

Enjoy! =)


Thursday, May 17, 2012

Chocolate Covered Straweberry Cake Pops

I thought it was about time I'd jump on the cake pop wagon and all I have to say is YUM! There are so so many flavor combinations for cake pops its crazy! My first (and definitely not last) cake pop creation consisted of strawberry cake mix and cream cheese frosting--tastes like a chocolate covered strawberry! 


CHOCOLATE COVERED STRAWBERRY CAKE POPS

instructions
  1. Mix and bake strawberry cake mix according to package, let cool completely.
  2. In large bowl, crumble the cake and stir in one container of cream cheese frosting.
  3. Roll into balls; place on baking sheet covered with waxed paper. Freeze the balls for about an hour or until firm. 
  4. Use cake pop sticks (I used bbq skewers) and stick them into middle of cake balls. 
  5. Melt chocolate of your choice (I did dark chocolate and white chocolate chips). Dip cake balls into the chocolate. 
  6. Allow for chocolate to harden. *to make a pink drizzle melt white chocolate chips and add a drop of red food coloring*
Reminder: Chocolate chips melt best in microwave when you add a little bit of oil to them! 

TA-DAH CAKE POPS! 


I can't wait to try other flavors-- what's your favorite cake pop combination? =)

Monday, May 14, 2012

Mother's Day Gifts

First off I hope everybody had a wonderful Mother's Day! I want to share the presents I made and put together. I really wanted to get them posted before Mother's Day but I've been super super busy, ya know how that goes.

For my sister: 
LOVE PICTURE FRAME
What I did: I bought wood letters from Michael's (I choose the ones that were already white but you can buy them not painted then paint them any color you want). Then I took my nephew and niece outside with them and started snapping shots. I picked out my favorite ones, edited them to black and white, and put them in a frame. My sister LOVED it. 

For my Aunt: 
HUGS AND KISSES FLOWER POT

What I did:  I got this idea from Little Pumpkin Grace where it was used as a teachers gift. I switched it up and worded it differently so it would fit my aunt. I filled up a flower pot with hugs and kisses, added a flower, and attached a note that said : "Aunts always deserve lots of hugs and kisses! Thanks for everything you do!" 

For my Grandma: 
I HAVE TO AD-"MITT" GIFT

What I did: I got this idea from Skip to my Lou and once again was a teacher's gift! I tweaked the note to saying: "I have to ad-"MITT" you truly are the best grandma" and then filled it with some of her favorite things. BTW It was hard not filling it with any candy, I figured she got enough from the candy note basket for her birthday :) 


Would love to hear some of things you got for Mother's Day!  =)

Wednesday, May 9, 2012

Candy Note Gift Basket

My Grandma's birthday is tomorrow and I love coming up with cute homemade gifts (they are soo soo much better than just a store bought gift!) Last Christmas I made my grandparents a fun candy bar card and they ADORED it! --which inspired me for my grandmas birthday gift! Using candy bar names I put together this fun little note: 

HAPPY BIRTHDAY BABY RUTH,
This is your day so you have every RIESEN to enjoy a FAST BREAK! Now that you’re 83, do you hear a SYMPOHNY of SNICKERS? It might just be your mind playing TWIX on you. Your bones will probably start to CRUNCH, making you as slow as TURTLES. Those HUNNY BUNS might start to feel a little CHUNKY. You’ll do things NOW & LATER and forget them both, saying where’s my WHATCHAMACALLIT? But don’t worry because I still think you’re worth 100 GRAND (or more) and love you to REESE’S PIECES. I couldn’t let this birthday ROLO by without wishing you MOUNDS of ALMOND JOY!
Love,
Your GOOBER grandchild

BTW my Gram's name is Ruth so baby ruth worked out perfect. You'll probably need to tweak it a bit and add/subtract your own lines, do it for birthdays, christmas, any occasion-- the possibilities are endless! Once you have your note figured out you can either write it out on a big poster board and replace the candy names with the actual candy bar (what I did for Xmas) or this time I put all the candy in a basket and wrapped it up all pretty ! 


This is my kinda present-- who doesn't like candy?? 

Happy Hump Day! =)

Tuesday, May 8, 2012

Meatloaf Cupcakes

Who said you couldn't have cupcakes for dinner? 

meatloaf recipe tweaked from my blessed life
Awhile back I came across this pin-- it was posted as a kid friendly meal even for the pickiest eaters. I planned on giving this a try for when my nephew comes over (still will) but meatloaf sounded so good tonight, I decided to whip it up. Turned out pretty cute if I say so myself. 

Here's how my I made my meatloaf:

ingredients
  • 1 lb ground turkey
  • 1 egg
  • 1/2 milk
  • 1 c shredded cheddar cheese
  • 1/2 c oats
  • 3/4 c chopped red onion
  • 1 tsp oregano
  • 1 tsp garlic powder
  • 1 tsp salt
  • ketchup, dijion mustard, and brown sugar
instructions
  1. Preheat oven to 350 F, grease muffin pan
  2. Mix together ground turkey, egg, milk, cheese, oats, onion, oregano, garlic powder, and salt.
  3. Divide mixture into muffin pan. Mix ketchup, dijion mustard, and brown sugar; glaze over each mini meatloaf. Bake for 1 hour or until the meat is thoroughly cooked. 
Time for the icing: Mashed Potatoes! Confession, I cheated on this part and whipped up some instant mashed potatoes. What ever kind you decide to make, take your mashed potatoes and put them in an icing bag (or a zip lock works just as well). Swirl over your mini meatloaves and garnish with oregano. TA-DA CUPCAKES FOR DINNER =)

Monday, May 7, 2012

Finger Knitting!

Alright here it goes-- the new popular thing every kid's doing these days or begging to learn: FINGER KNITTING! I figured before camp starts it's pretty much mandatory for me to learn it, just in case if I come across some little fingers that want to try doing it. So I learned today--Yay for me! (I was actually taught by one of my third graders). It is actually pretty easy to do and very neat. I taught it to one of my kindergartners and she caught on really quick. This is a great craft for the kiddies of all ages,  they love it and it'll keep them entertained for hours! Here's how mine turned out: 


BTW meet little Miss Chloe-- She did such a good job being mama's little model for the scarf! 

To learn how to finger knit I recommend checking out Pretty Ditty-- great tutorial with descriptive steps and pictures! ENJOY =)


Loaded Banana Bread Cookies

I had some bananas I had to use up so I decided to whip together some banana cookies. It was too hard to just add one thing to it, so I ended up adding a little bit of everything and calling them Loaded Banana Bread Cookies! They are so chewy and moist-- reminds me of a muffin top!
Recipe tweaked from Two Peas and Their Pod
ingredients
  • 1 1/4 c flour
  • 1 tsp baking soda
  • 1/2 tsp salt
  • 4 tbsp butter
  • 1/2 c brown sugar
  • 1/2 c sugar
  • 1 tsp vanilla
  • 1 egg
  • 2 bananas (mashed)
  • 2 c oats
  • 1/2 c chocolate chips
  • 1/2 c peanut butter chips
  • 1/2 c chopped nuts
instructions
  1. Mix together flour, baking soda, and salt; set aside
  2. In another bowl, cream together butter and sugars. Add vanilla, egg, and bananas. Beat in flour mixture little at a time. After all mixed together add in oats, chips, and nuts.
  3. Drop by spoonfuls on greased cookie sheet. Bake at 350 F for about 10-12 minutes or until toothpick comes out clean. Cool on wire racks. Enjoy!

Friday, May 4, 2012

It's a fiesta!

With Cinco De Mayo being tomorrow, me and the kiddos had a little fiesta! We crafted up some homemade pinatas and those cute little sombrero cookies! 


Homemade Pinatas:
Take a lunch size brown paper bag and open it up all the way. Cut strips of tissue paper and make slits in them; tape them around the paper bag. Repeat this until the whole bag is covered with the tissue paper strips. Now fill them with candy; staple and tape shut. The kiddos had so much fun with this, ecspeically when it was time to take a swing at them! 

Sombrero Cookies: 
  • sugar cookies
  • white icing
  • gum drops
  • sprinkles
  1. Frost the edge of the sugar cookie; roll it in the sprinkles until it is covered.
  2. Frost the bottom and lower edge of the gum drop; roll the icing part of the gum drop in the sprinkles. Stick in the middle of the sugar cookie!

Que tenga un buen dia (Have a good day!) =)


Thursday, May 3, 2012

Chicken Salad Sandwiches

Nom...nom...nom--so easy and tasty!


CHICKEN SALAD SANDWICHES 
ingredients
  • 3 tbsp fat free plain yogurt
  • 3 tbsp dijon mustard
  • 1/2 c chopped celery
  • 1/2 c grapes (quartered)
  • 1/2 c chopped apple
  • 2 tsp oil
  • 1 canned chicken
instructions
  1. Drain chicken from can; brown on the stove and shred (let cool)
  2. Mix together yogurt, mustard, and oil
  3. Add celery, grapes, apple, and chicken
  4. Season with salt & pepper

Got Noodles?

I've had a box of noodles left over from when we used them to make noodle necklaces. Every time I open the cabinet there they are staring me in the face. Now of course I can't just throw them away that would be a waste, so I thought what else can we do with these?  I came up with the idea of making noodle art-- using the noodles to make words or pictures! Here's how some of them turned out:
One of my second graders thought to make one for mothers day-- such a cute idea! She hasn't painted it yet but once she does I'll be sure to upload it! 


what you need:
  • cardboard
  • noodles
  • paint
  • tacky glue
what you do:
  1. arrange the noodles how you want them on a piece of cardboard
  2. use tacky glue to keep them in place
  3. paint how ever you want and let dry !
Be creative, have fun =) 


Tuesday, May 1, 2012

Edible Sand Cups

The kiddies love making those little sand jars by layering different colors of sand but it's even better when the sand is edible! All you need is some fruit loops! Here's how it works:
  1. Sort the fruit loops into different colors
  2. Crush them up until the fruit loops look like sand
  3. Use a clear plastic cup and layer spoonfuls of the different colors of "sand" 
  4. EAT AND ENJOY! =)

Monday, April 30, 2012

Weekend Wrap-Up

That little precious nephew of mine spent the whole weekend with me which turned into an eventful weekend of baking, cooking, and crafting! Here's what I got for you:

For starters, I told you I'd be back with more cake batter recipes and here I give you 
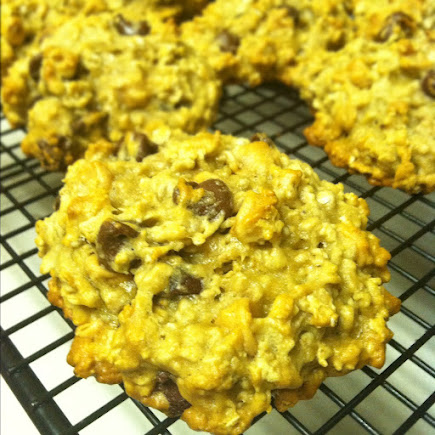
CHOCOLATE CAKE BATTER COOKIES! (a major nephew hit) I came across a cake batter cookie recipe over at Chef in Training that included a special ingredient, pudding. The only problem was it called for vanilla and I only had chocolate fudge on hand. I thought what the heck, might as well give it a try. Me oh my what a good try because now I have chocolate cake batter cookies! Can you say YUM!


CHOCOLATE CAKE BATTER COOKIES
ingredients
  • 1 1/2 sticks butter
  • 3/4 c brown sugar
  • 1/4 c sugar
  • 1 package chocolate fudge pudding mix (dry)
  • 3/4 c yellow cake mix (dry)
  • 2 eggs
  • 1 tsp vanilla
  • 1 tsp baking soda
  • 2 1/4 c flour
  • 1/2 tsp salt
  • LOTS of sprinkles
instructions
  1. Preheat oven to 350 F
  2. Mix together flour, baking soda, and salt 
  3. In another bowl cream butter and sugars together. Beat in pudding and cake mix. Add eggs and vanilla, mixing until smooth
  4. Gradually add in flour mixture
  5. Mix in LOTS of sprinkles
  6. Roll into balls onto greased baking sheet. Bake for 10-12 minutes
On to the next,
My nephew may just be the pickiest of picky eaters. In his world there are three food groups: chicken nuggets, chips, and cookies. I'll admit I give into the cookie category a little too much but hey I'm the aunt, I'm allowed to. Anywho, I'm always thinking of what I can make that he is actually going to to eat or how can I make something so he will eat it. This brings me to M&M PANCAKE SHAPES. Simply whip up your favorite pancake mix (thank you aunt jemima complete for only having to add water), add m&ms, throw on the griddle, use cookie cutters to make into fun shapes. Ta-Dah, he loved them! 


Dinner Time My sister and niece came over to join us for dinner. My niece is not as picky as my nephew but still pretty picky. Then you got my sister who's a vegetarian. Great, now what could I make that everybody is going to eat? When in doubt, make mac & cheese. I stumbled across this homemade mac & cheese recipe from Chef in Training (such great food over there) that I happened to have all the ingredients minus the broccoli. To go along with it, I whipped up some of my cheesey garlic biscuits
HOMEMADE MAC & CHEESE
ingredients
  •  14oz box of pasta noodles
  • 1 tsp butter
  • 1/3 c bread crumbs
  • 3 tbsp parmesan cheese, divided
  • 2 1/2 c milk
  • 1/3 c flour
  • 1/2 c chopped onions
  • 1 c cheddar cheese
  • 1 tsp dijon mustard
  • 1 1/2 tsp salt
  • 1/2 tsp pepper
instructions
  1. Preheat oven to 375 F. Coat a shallow 2-quart baking dish with cooking spray.
  2. Cook pasta according to package; drain and return to pot. 
  3. Meanwhile, in a large saucepan, melt butter over medium heat; add bread crumbs and cook, until light golden. 
  4. Remove from heat and transfer crumbs to a small bowl; stir in 1 tablespoon of Parmesan cheese and set aside.
  5. In same saucepan, whisk together milk and flour until blended; add onion. Bring to a boil over medium-high heat, whisking frequently. Reduce heat to low and simmer until thickened, about 2 minutes.Remove from heat and whisk in cheddar cheese, mustard, salt, pepper and remaining 2 tablespoons of Parmesan cheese. 
  6. Pour over cooked, drained pasta; toss to mix and coat. Transfer to a baking dish; sprinkle with bread crumbs. Bake 20-25 minutes. 
CHEESEY GARLIC BISCUITS
ingredients
  • 2 c biscuit mix
  • 2/3 c milk
  • 1/3 c shredded mozzarella cheese
  • 1/3 c shredded cheddar cheese
  • 3 tbsp melted butter
  • 1/8 tsp garlic powder
instructions
  1. Preheat oven to 450 F
  2. Stir together biscuit mix, milk, & cheeses. Drop by spoonfuls onto ungreased cookie sheet.
  3. Bake 8-10 minutes. Melt butter; stir in garlic powder; brush on top of warm biscuits. 
Sunday morning, the sun was shinning, the birds were chirping, and I had us some Banana Peanut Butter Muffins in the oven. Mmmmmm...
BANANA PEANUT BUTTER MUFFINS
ingredients

batter: 
  • 1 1/2 c flour
  • 1 tsp baking soda
  • 1 tsp baking powder
  • 1/2 tsp salt
  • 2 bananas, mashed
  • 3/4 sugar 
  • 1 egg
  • 1/3 melted butter
  • 1 tsp vanilla
  • 1 tsp cinnamon
  • 1 tsp nutmeg
  • 2/3 peanut butter
topping:
  • 1/3 c brown sugar
  • 2 tbsp flour
  • 1/4 tsp cinnamon
  • 2 tbsp butter
  • 1/3 c chopped peanut butter chips
instructions
  1. Preheat oven to 375 F, line 10-12 muffin cups with muffin papers
  2. Mix together flour, baking soda, baking powder, and salt. In another bowl, beat together bananas, sugar, egg, melted butter, vanilla, cinnamon, nutmeg, and peanut butter. Stir in flour mixture until all combined; spoon into muffin cups. 
  3. Mix together all topping ingredients until mixture resembles coarse cornmeal; sprinkle over muffins.
  4. Bake 18-20 minutes 

These turned out way yummy I had to share (although I could have kept them all for myself). I packed a few of them up and gave them to my grandma & grandpa. =)


Moving on to the Crafting, First project-- recycled crayons. These are pretty neat to make; my nephew had a fun time breaking up the crayons and was fascinated by how they turned out! 

Easy peasy-- break up old crayons, fill them in foil lined muffin tins (I used a mini muffin tray), bake 8 minutes on 275 F. Let them cool, pop them out, & get to coloring again! 
Last but not least, my favorite of the weekend & I think my nephew would agree-- SALT DOUGH HAND PRINTS: 
materials
  • 1 c flour
  • 1/2 c salt
  • cold water
instructions
  1. Mix together flour and salt; add enough water to form a consistency like play dough
  2. Roll into balls and flat out with a rolling pin on greased cookie sheet
  3. Push that little hand down to form a hand print (I also added their names)
  4. Bake at 250 F for 2 hours; let them completely cool (I let it cool over night)
  5. PAINT and let dry! 
These measurements gave enough dough for two hand prints with a little extra dough left over. We used the leftovers and made shapes out of them--  train for my nephew, heart for my niece 


Little Hands at Work

Now that's what I call a weekend! Enjoy =) 

Thursday, April 26, 2012

What on Earth did we just create?

Okay I know I'm a little late on Earth Day, but my students and I did a week long Earth day project that we just finished-- a Recycled T-Shirt Quilt. All the kids loved the idea and enjoyed taking part in crafting it. The finished product turned out even better than I thought it would!

Isn't it so cute? My kiddies did an awesome job on it-- Now here's how you make it:
RECYCLED T-SHIRT QUILT

Materials: 
  • Old T-Shirts
  • Yarn
  • Markers
  • Hole Puncher

Instructions: 

  1. Cut squares out of old T-Shirts (the quilt probably could have turned out neater if all the squares were the same size but the kids had fun with cutting their own squares to the size they wanted)
  2. Have the children draw or write ways to help the environment on their squares 
  3. Layout the squares in a pattern for a quilt
  4. Hole punch the squares together and tie them together with yarn
  5. WALLAH it's a Quilt !  
Now the only problem--the kids are fighting over who gets to keep it. And that answer would be ME! =)

Happy Crafting-- go green ! 

Wednesday, April 25, 2012

Let's Celebrate

Welcome Welcome! I'm super excited to get started on this new blog I have created and what better way to get started than with some cake -cake batter that is! I've got this naughty sweet tooth and cake batter seems to get me in trouble every time (it's so worth it). So here it goes...


 CAKE BATTER & CHOCOLATE GRANOLA BITES
originally by Sally's Baking Addiction


The original version of these didn't call for chocolate but that sweet tooth of mine was peer pressuring me into adding it and well I gave in! DELICIOUSNESS! 


Ingredients:


  • 2 1/4 cups whole rolled oats
  • 1/2 cup yellow cake mix 
  • 1/2 cup light corn syrup
  • 1 tsp. vanilla
  • 1/2 cup of sprinkles 
  • 1/4 cup chocolate chips
  • extra chocolate chips for drizzle 
Instructions: 
  1. Combine and mix all ingredients together until all oats are moistened 
  2. Refrigerate mixture until stiff and all stuck together 
  3. Roll into balls and drizzle with chocolate. 
These for sure get me in trouble. I can't stop eating them! Don't worry more cake batter recipes will soon follow. Enjoy :)